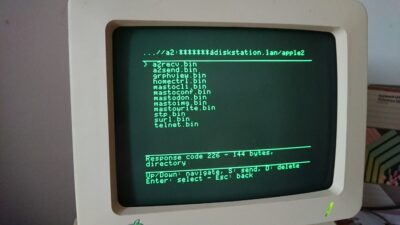
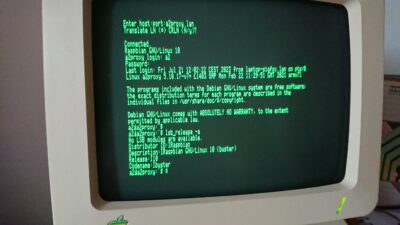
Using the same serial/network proxy as I do for my Apple II Mastodon client, I have released floppies containing a few useful utilities to get your Apple 2 online.
Files:
You can find the releases on GitHub.
| Program | Apple II model | Image |
|---|---|---|
| STP | ][+, IIe, 6502 CPU with 64kB of RAM | stp-6502.po |
| //c, //c+, IIe enhanced or platinum, 65c02 CPU / 128kB of RAM | stp-65c02.po | |
| STP | IIgs | stp-iigs.po |
| Telnet | //c, //c+, IIe enhanced or platinum, 65c02 CPU / 128kB of RAM | telnet-65c02.po |
| Telnet | IIgs | telnet-iigs.po |
You will also need the surl-server-bullseye-YYYY-MM-DD-lite.img.gz Raspberry proxy image, or to build it yourself.
If you update the Apple 2 disk(s), make sure to update the proxy too, sometimes the surl-server protocol changes. If you already have a surl-server Raspberry running, you can apt update && apt upgrade.
Contents:
STP – an FTP client for the Apple II. This is a simple FTP client that can connect anonymously or using a login to an (S)FTP server. It will allow you to list directories, change directories, get files, put files, and download floppy images. If you download an AppleSingle binary file, it will be saved executable so that you can BRUN it.
telnet – a… telnet client for the Apple 2. It will allow you to connect to anything plain text, as long as you know the protocol. It has basic working vt100 emulation, which means you can connect to interactive shells and perform system administration like in the 1990’s.
First step: get the client to a floppy
You can send the stp.po or telnet.po floppy image to your Apple 2 using ADTPro, which I won’t cover here, as there are a lot of good tutorials available on the web.
Second step: get the proxy ready
You can then prepare the surl-server Raspberry by writing the surl-server-bullseye-….img file to a MicroSD card (gunzip it first!), and using it with a Raspberry connected to the network via Ethernet, and to the Apple 2 via the USB-serial cable, which other end will be plugged in the Apple 2 serial port #2.
The login/password on the image is the standard Raspbian default login: pi/raspberry. The image is a very standard Raspbian image with surl-server installed via apt.
You can now boot your Apple II with the desired floppy.
Helpers links:
- ADTPro to transfer the .po images to the Apple //c
- Writing an image to a micro-SD card for the Raspberry
- DIN-5 to USB serial cable adapter: DIN-5 to DB-9, then any DB-9 to USB adapter.
Screenshots:

